English
Views: 0 Author: Site Editor Publish Time: 2025-12-19 Origin: Site

You help protect the environment when you install an oily water separator on your ship. This machine effectively removes oil from water before it is discharged into the sea, ensuring compliance with environmental regulations. Utilizing an oily water separator not only helps you adhere to the law but also contributes to the well-being of marine life, keeps the ocean clean, and demonstrates your commitment to the planet. Many shipowners are recognizing the value of this essential tool, with projections indicating that by 2025, spending on oily water separators will reach $1,974.7 million. This growth reflects the increasing adoption of these devices in the maritime industry. If you are wondering, "What are the installation requirements for oily water separators?", it’s crucial to ensure that your ship meets all regulations, supports environmental protection, and maximizes your investment. Every action you take aids the earth and enhances your vessel's operations by preventing oil from entering the sea.
Installing an oily water separator keeps oil out of the ocean. It removes oil from water before it goes overboard.
Pick a separator that fits your ship’s size and needs. This helps it work well.
Always follow the rules. Keep oil levels under 15 parts per million to stay safe.
Clean filters often and check for leaks. This keeps your separator in good shape.
Use separators that are certified. This makes sure you follow the rules and stay safe.
Teach your crew how to use and care for the oily water separator. This helps stop mistakes.
Choose a spot for the separator that is easy to reach. This makes cleaning and fixing it easier.
Write down all cleaning and checks. This helps you pass checks and keeps things working right.
An oil water separator takes oil out of water before it leaves your ship. This device helps keep the ocean clean. It also helps you follow important rules. Oil water separators work in different ways. You can look at the main types in the table below:
Type | Description |
|---|---|
Gravity Separation | Uses plates to split oil and water. Sometimes heat helps it work better. Extra steps may be needed to meet 15-ppm rules. |
Centrifugal Separator | Spins the mix to pull oil out. Handles hard oils. Needs power and more care but works with little help. |
Absorption and Adsorption | Uses special stuff to soak up oil. You must change these when they get full. |
Flocculation and Coagulation | Adds chemicals to stick oil together. You skim off the clumps. This makes sludge and needs chemicals. |
Biological Treatment | Uses tiny living things to eat oil. Works well but takes time and costs more at first. |
Filtration | Uses filters to catch oil and big bits. Needs cleaning to keep working. |
You find oil water separators in many places on ships. They treat bilgewater and clean water from engine rooms. These devices help remove oil and protect the sea.
If you pick a deyuanmarine oil separator unit, you get smart technology and strong performance. The table below shows what makes these units special:
Unique Feature | Description |
|---|---|
Patented Technology | Uses special designs that make oil water separation better. |
Reliable Performance | Works well in many places and keeps running smoothly. |
Automatic Control | Lets you manage the unit easily with simple controls. |
15ppm Alarm Device | Alerts you if oil in the water gets too high, helping you stay safe. |
You can use a deyuanmarine oil separator unit for many jobs. These units help you follow strict rules and make your work easier.
It is good to know how these units work. Here are some important ideas:
Gravity makes oil float so you can take it out.
Bigger oil drops and warmer water help separation go faster.
Smooth flow inside the unit helps oil separate better.
You see these ideas in every oil separator unit. They help you get clean water and keep oil out of the sea.
In 2025, you must follow new rules for oil water separators. The main goal is to keep oil in water below 15 parts per million. The API 421 standard now asks for extra steps to reach this goal. You need a separator that can handle small and tough oil drops.
Deyuanmarine oil separator units meet these standards. You can check the certifications in the table below:
Certification | Source |
|---|---|
ABS | |
BV | |
GL | |
DNV | |
LR | |
CCS | |
USCG | |
Rina | |
Ec |
You can trust a deyuanmarine oil separator unit to help you follow the rules. These units give you peace of mind and help you protect the environment.
If you want to know, "what are the installation requirements for oily water separators?", you need to check three main things. These are rules, product certifications, and safety or environmental needs. Each one helps your oily water separator work right and follow the law.
You have to follow important rules when you put in oily water separators on your ship. These rules protect the ocean and help your ship stay legal. Here is what you should remember:
Ships bigger than 400 gross tons (GT) must have an oily water separator and a 15 ppm bilge alarm.
The oily water separator must make water with less than 15 parts per million (ppm) of oil.
Ships over 10,000 GT need an oil content meter that makes a sound if oil is more than 15 ppm.
You must put in and test the machine by MEPC rules, like MEPC.107(49) and MEPC.285(70).
The oily water separator must have a design that the flag state’s office says is okay.
The system must stop letting out water if oil is over 15 ppm.
When you get ready to install, think about your ship’s shape and how your crew learns. The table below shows what else matters:
Factor | Description |
|---|---|
Design Factors | Learn how your oily water separator works and any special features it has. |
Operational Knowledge | Make sure you and your crew know how to use the oily water separator the right way. |
Bilge Management | Watch what goes into the bilge to keep oil out. |
Care and Maintenance | Clean and check the oily water separator often so it works well. |
Equipment-Specific Knowledge | Know the special things about your oily water separator model. |
Crew Attitude and Training | Teach your crew and help them use good habits with the oily water separator. |
Good Housekeeping | Keep the engine room clean to make less oily water. |
To answer, "what are the installation requirements for oily water separators?", you need to look at both the rules and what your ship needs.
Certifications show your oily water separator is safe and meets high standards. When you pick a oily water separator, look for these certifications:
Certification | Description |
|---|---|
USCG | Follows United States Coast Guard rules for ships. |
ABS | Approved by the American Bureau of Shipping. |
BV | Checked by Bureau Veritas. |
CSS | Meets IMO/MEPC 107(49) rules. |
These certifications prove your oily water separator is safe, works well, and is legal for ships. They also help you answer, "what are the installation requirements for oily water separators?" because only certified machines pass checks. For example, Deyuan Marine’s oily water separators have ABS, BV, DNV, LR, and other big certifications. This means you can trust them to follow all rules and work well on your ship.
Certifications also help you choose the right oily water separator. The table below explains more:
Certification Body | Certification Details | Impact on Selection |
|---|---|---|
U.S. Coast Guard (USCG) | Certified for IMO MEPC 60(33) and MEPC 107(49) | Makes sure you meet legal and safety rules. |
International Maritime Organization (IMO) | Sets world rules for oily water separators. | Shows your machine follows tough rules. |
ABS | Type approval for ships. | Proves it is reliable and follows industry rules. |
When you pick a oily water separator, always check for these certifications. They help you follow the law and answer, "what are the installation requirements for oily water separators?" with confidence.
Safety and caring for the environment are very important when you put in oily water separators. You need to think about more than just the machine. Here are some key points:
Use the right drains to keep clean and dirty water apart.
Make your tanks so waste oil does not get into the bilge.
Keep your oily water separator and other parts clean for best results.
Watch for strict rules about oil in water.
Treat the oily water separator as part of a bigger system, not just by itself.
If you want to know, "what are the installation requirements for oily water separators?", you need to look at the whole system. Good planning and regular checks stop spills and keep your ship safe. You also help the ocean and show you care about nature.
Tip: Always teach your crew how to use and take care of the oily water separator. Good training stops mistakes and keeps your ship legal.
When you do these things, you answer, "what are the installation requirements for oily water separators?" in a way that keeps your ship legal, safe, and good for the environment.
Check your vessel’s space before you install oil water separators. Find a spot with enough room for the unit and crew. Make sure the area is easy to reach for cleaning and maintenance. Good placement helps stop leaks or spills when you dispose of waste. Think about how water and oil move in the area. Slow water flow helps oil separate better, so plan the spot to help this.
Factor | Description |
|---|---|
Flow Rate | Slower flow rates help oil separate more easily. |
Design Capacity | The separator must be big enough for all oil and sludge. |
Emulsifying Agents | Chemicals like detergents can make oil mix with water and slow separation. |
You must keep the environment safe during installation and use. Always keep clean water and dirty water apart. Use the right drains so oil does not go into the sea. Plan how to safely get rid of oil and sludge. Check often for leaks so you can fix them fast. Teach your crew how to handle spills and disposal safely. Good habits keep your vessel safe and help you follow the rules.
Tip: Always look for chemicals like detergents in your bilge. These can make oil harder to separate and harder to dispose of.
Pick a separator that fits your vessel’s size and oily water amount. If the unit is too small, it cannot keep up with bilge water. This can cause shutdowns and unsafe disposal. If the unit is too big, you waste money and space. The right size helps performance and saves costs. Think about the type of oil in your bilge. Some oils float, but some mix with water. This changes how much oil-absorbing media you need and how often you dispose of waste.
Think about your vessel’s size.
Check the space for installation.
Find out what kind of contamination is in the bilge.
Decide how long the system will run.
Deyuanmarine has many oil water separator models. You can pick different sizes and features. Each model meets strict world standards. When you choose a separator, look for these things:
Criteria | Description |
|---|---|
High efficiency means less oil in water and easier disposal. | |
Material Strength | Strong materials last longer in tough marine places. |
Easy Maintenance | Simple cleaning and replacement save time and lower disposal risks. |
Capacity | Pick the right size for your vessel’s needs. |
Certification | Certified units help you avoid fines and keep disposal safe. |
You need the right tools to install smoothly. Common tools are:
Wrenches and screwdrivers
Pipe cutters
Measuring tape
Safety gloves and goggles
Some systems may need special tools for their technology.
Get all your materials before you start. You may need:
Pipes and fittings for water and oil lines
Seals and gaskets
Mounting brackets
Absorbent pads for safe disposal of spills
Different oil water separators use different methods. Gravity separation uses density differences. Chemical absorption uses special media. Some systems use both methods to meet disposal rules. Always check your model’s manual for a full list of materials.
Note: Good planning and the right materials make installation and disposal safer and easier.
You need to get your tank and lines ready before you put in oil water separators. This helps your system last longer and work better. First, take out big pieces and floating trash from the bilge water. Use strainers to catch these things before they get to the oil water separator filter. This stops the filter from getting blocked and keeps everything running well.
Here are some good steps for cleaning and removing debris:
Use strainers to catch big trash.
Try not to let too much oil get into the bilge wells. Move large amounts of oil to a special oil tank.
Warm up the bilge water. Warm water makes oil come out faster.
Do not mix sludge or other dirty stuff with bilge water.
Fill the oil water separator with clean water. Make sure there is no air inside.
Backflush the oil water separator filter often to keep it working well.
Clean the interface sensors a lot so you get good readings.
Take out any leftover oil in the separator chambers by hand.
Tip: Always do what the manufacturer says for cleaning and care. Taking care of your system stops big repairs and keeps your ship following the law.
After you clean, you need to put in risers and adapters. These parts help connect your tank and lines to the oil water separator filter. Pick the right size and type for your system. Make each riser and adapter tight so nothing leaks. Check all the connections to make sure they fit well. This step helps water move into the oil water separator filter and keeps oil from leaking out.
Put the oil water separator on a flat and steady spot. Use a level to see if the unit sits straight. If it leans, oil and water will not split well. Hold the unit down with mounting brackets or bolts. Tighten all the bolts so the separator does not move when the ship is working.
Note: A flat and steady oil water separator filter works better and leaks less.
Pick a spot that is easy to reach. You and your crew need space to check, clean, and fix the oil water separator filter. Good access helps you find problems early and fix them fast. Make sure there is enough room to take out and put in the oil water separator filter parts when you need to.
The oil water separator filter is the most important part of your system. Put each filter element in the right place. Follow the steps in your manual. Each filter element must fit tight in its spot. If a filter is loose, oil can get through and the system will not work as well.
Here is how you usually set up the system:
Put the oil water separator in a clean and easy-to-reach place.
Connect the separator to a condensate manifold that collects water from all main parts.
Make sure each part has a drain line going to the manifold.
Let water go through drain valves into the manifold.
Let the water go into a chamber for cyclonic depressurization.
Send the liquid into a polypropylene oil water separator filter cartridge to catch oil.
Move the water through an activated carbon cartridge to grab the last oil bits.
Let the clean water go out through a safe drain.
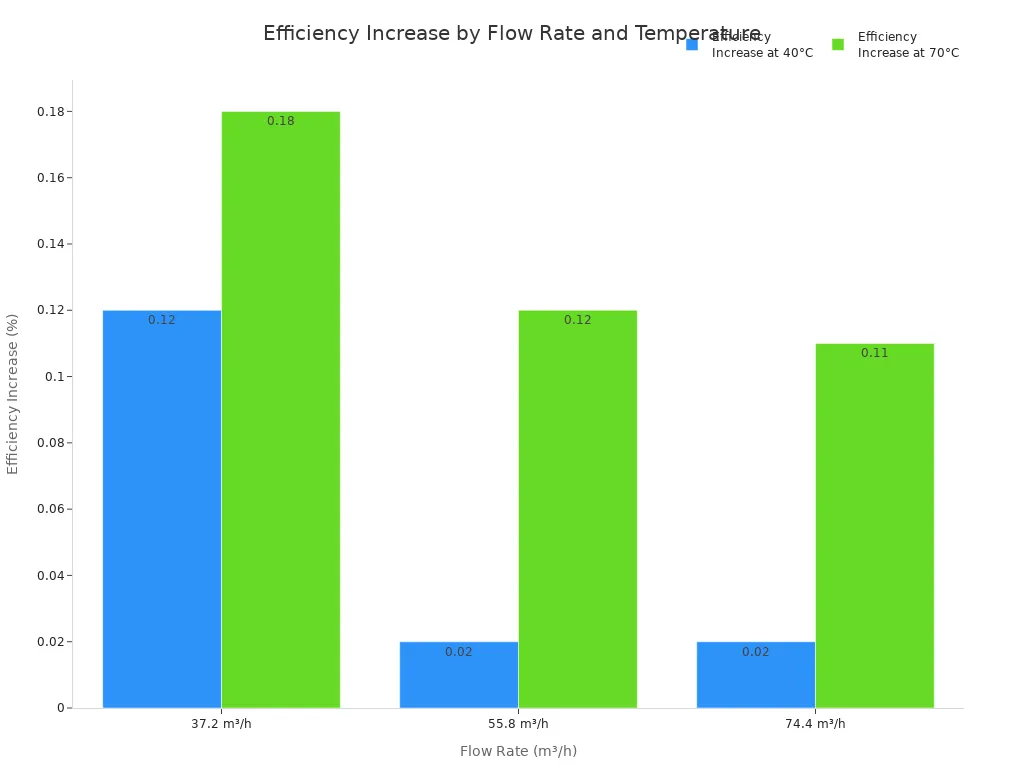
The kind of oil water separator filter you use changes how well your system works. The table below shows how different filters work at different flow rates and temperatures:
Flow Rate (m³/h) | R² Coefficient | Efficiency Increase (%) at 40°C | Efficiency Increase (%) at 70°C |
|---|---|---|---|
37.2 | 0.993 | 0.12 (400 mg/m³) | 0.18 (400 mg/m³) |
55.8 | 0.994 | 0.02 (800 mg/m³) | 0.12 (800 mg/m³) |
74.4 | 0.994 | 0.02 (1200 mg/m³) | 0.11 (1200 mg/m³) |
You can see that filters work better with higher flow rates, especially if you use oleophobic filter media. These filters catch oil drops better because they make a thick film and stop liquid channels.
Before you start, fill the oil water separator with clean water. This step gets rid of air and gets the oil water separator filter ready to work. Open the water inlet valve slowly. Look for leaks around the filter housing. When the chamber is full, check that all filter elements stay in place. If you see bubbles, fill again until only water comes out.
Alert: Never run the oil water separator filter without water. Running dry can break the filter and make the system work worse.
Now your oil water separator filter is ready to use safely and well. Checking often and setting up right keeps your system working and helps you follow all the rules.
Connecting your oily water separator to your ship’s systems is a key step. You need to set up both the pipes and the power. Good connections help your separator work safely and meet all rules.
You must connect the pipes that bring oily water in and send clean water out. Start by checking the pipe sizes. The inlet pipe brings oily bilge water to the separator. The outlet pipe carries treated water away.
Steps for Piping:
Measure the distance from the bilge to the separator.
Cut pipes to the right length.
Attach the inlet pipe to the bilge pump outlet.
Connect the outlet pipe to the clean water discharge point.
Use strong clamps and seals to stop leaks.
Check that all joints fit tight.
Tip: Use corrosion-resistant pipes. Stainless steel or high-grade plastic works best on ships.
You should keep the pipes as straight as possible. Bends and turns slow the flow and make cleaning harder. If you must use bends, keep them gentle. Place shut-off valves near the separator. These valves help you stop the flow for cleaning or repairs.
Table: Common Pipe Materials and Their Benefits
Material | Benefit | Use Case |
|---|---|---|
Stainless Steel | Rust-proof, strong | Most marine systems |
PVC Plastic | Light, easy to install | Small vessels, low flow |
Copper | Good for heat, easy to bend | Special cases |
Check for leaks after you finish. Run water through the pipes and watch each joint. Tighten any loose fittings. A leak-free system keeps your ship safe and clean.
Your oily water separator needs power to run pumps, alarms, and control panels. You must connect it to your ship’s electrical system.
Steps for Power Connection:
Find the power rating on the separator’s label.
Use the right size wires for the current.
Connect the separator to a protected circuit.
Install a circuit breaker or fuse for safety.
Ground the unit to stop electric shocks.
Alert: Always turn off the main power before you work with wires. Wear safety gloves and use insulated tools.
You should follow the wiring diagram in your separator’s manual. Each wire must go to the right terminal. Secure all wires with cable ties. Keep wires away from hot surfaces and moving parts.
Some separators have control panels with alarms. These alarms warn you if oil levels get too high. Test the alarms after you connect the power. Make sure the control panel lights up and the buttons work.
Checklist for Electrical Safety:
Use only marine-grade cables.
Double-check all connections.
Test the system before full operation.
Keep the area dry and clean.
A good power supply helps your separator run smoothly. You protect your crew and your ship when you follow these steps.
When you finish installing your oily water separator, you need to connect it to your ship’s control system. This step helps you monitor and manage the separator easily. Most modern separators, like those from Deyuan Marine, come with control panels. These panels let you check the system’s status and make quick adjustments.
You should follow the wiring diagram in your separator’s manual. Connect the control cables to the main control panel. Make sure each wire goes to the correct terminal. Use cable ties to keep wires neat and safe. Double-check all connections before you power up the system.
Automation makes your oily water separator easier to use. Many separators offer automatic start and stop features. These features help you save time and reduce mistakes.
Here are some common automation options:
Automatic Start/Stop: The separator turns on when oily water enters and shuts off when the tank is empty.
Oil Content Alarm: The system alerts you if oil in the water goes above 15 ppm.
Remote Monitoring: You can check the separator’s status from the ship’s main control room.
Self-Cleaning Cycle: Some models clean their filters automatically.
Tip: Automation helps you follow rules and keeps your crew safe. Always test automation features after setup.
After you connect the control system, you need to test the oily water separator. Testing makes sure everything works before you use the system at sea.
Start by checking for leaks. Fill the separator with clean water. Watch all pipes, joints, and valves. If you see drips or wet spots, tighten the fittings. Run the system and check the flow rate. The water should move smoothly through the separator.
Use this checklist for leak and flow checks:
Inspect all pipe joints for leaks.
Check the separator body for cracks.
Make sure water flows at the right speed.
Listen for strange noises from pumps or valves.
Alert: Fix leaks right away. Even small leaks can cause big problems at sea.
Calibration helps your separator give accurate readings. You need to set the oil content meter and alarms. Follow the steps in your manual.
Fill the separator with water that has a known oil content.
Adjust the oil content meter until it matches the sample.
Test the alarm by raising the oil level above 15 ppm.
Reset the system and check that alarms clear when oil drops.
A well-calibrated system helps you stay within legal limits and avoid fines. Test calibration every few months to keep your separator working right.
Note: Always record your calibration results. Good records help you pass inspections and prove compliance.
You have to make sure your oily water separator follows all the newest rules. First, check what MARPOL and your flag state say. These rules help you keep the ocean safe and stop you from getting fines. Always look at your setup and see if it matches the approved plans. Only use certified parts and do what the manufacturer tells you.
You must keep good records for every part of the installation. Inspectors will want to see these papers during checks. Here is what you should save:
Certificates from the separator maker
Test results for oil content and alarms
Calibration logs for meters and sensors
Crew training records for using the separator
Maintenance and cleaning schedules
Tip: Keep your records in a safe and easy place. Digital copies make sharing faster.
A table can help you sort your records:
Document Type | Who Provides It | How Often to Update |
|---|---|---|
Installation Certificate | Manufacturer | Once, after install |
Test Results | Crew/Inspector | After each test |
Calibration Log | Crew/Technician | Every calibration |
Training Log | Ship Management | After each session |
Maintenance Record | Crew | After each service |
Check your oily water separator for safety before you use it at sea. Walk around and look for leaks, loose bolts, or broken wires. Test the alarms and emergency shut-off buttons. Make sure warning labels are clear and easy to see.
Look at pipes and joints for leaks
Make sure bolts and brackets are tight
Test the oil content alarm and shut-off valve
Check that emergency stop buttons work
Alert: Never skip a safety check. Small problems can turn into big dangers on the water.
Train your crew to handle emergencies. Practice what to do if the separator leaks or the alarm goes off. Put clear instructions near the separator. Make sure everyone knows how to turn off the system fast.
Here is an easy emergency plan:
Stop the separator with the emergency button.
Close the inlet and outlet valves.
Tell the officer in charge about the problem.
Use absorbent pads to clean up spills.
Write down the incident in the logbook.
Note: Practice drills often so your crew stays calm and acts fast in real emergencies.
When you follow these steps, you keep your ship safe and legal. Good checks and training help you follow all rules and protect the ocean.
You may face some common problems when you install oil water separators. Knowing these issues helps you fix them quickly and keep your system running well.
Leaks at Pipe Joints: Water or oil can leak if you do not tighten the fittings enough.
Low Flow Rate: Blocked filters or pipes can slow down the water flow.
Alarm Not Working: The oil content alarm may not sound if the sensor is dirty or not connected.
Power Problems: The separator may not start if the power supply is not correct.
Unusual Noises: Strange sounds can mean something is stuck inside the separator.
You can solve most problems with simple steps. Here is a table to help you:
Issue | Solution |
|---|---|
Leaks | Tighten fittings and check seals. |
Low Flow Rate | Clean or replace filters and clear pipes. |
Alarm Not Working | Clean the sensor and check the wiring. |
Power Problems | Check the circuit breaker and wiring. |
Unusual Noises | Stop the unit and remove any blockages. |
Tip: Always turn off the power before you work on the oil water separator.
You keep your oil water separator working best when you follow a regular maintenance plan. Simple checks and cleaning help you avoid bigger problems later.
Set up a cleaning schedule for your separator. Here is a sample plan:
Daily: Check for leaks and listen for odd noises.
Weekly: Clean the filter elements and sensors.
Monthly: Inspect all pipes and electrical connections.
Every 3 Months: Test the alarm and calibration.
Yearly: Replace worn parts and review the whole system.
Note: Write down each cleaning and check in your logbook. Good records help you pass inspections.
Sometimes you need expert help. Contact deyuanmarine support if you see these signs:
The oil water separator does not start after you check the power.
The alarm keeps sounding even after cleaning the sensor.
You find damage to the main parts or control panel.
You cannot fix leaks or blockages with normal steps.
You need help with calibration or certification.
You can reach out to deyuanmarine for fast support and advice. Their team helps you solve problems and keeps your oil water separators working safely.
This checklist helps you install your oily water separator the right way. Do each step in order. Mark off each task when you finish.
Review Regulations and Certifications
Read the newest MARPOL and flag state rules. Make sure your separator has all needed certificates.
Assess the Site
Measure your vessel’s space. Choose a spot that is flat, dry, and easy to reach.
Select the Right Separator
Pick a model that fits your vessel’s size and bilge water needs. Check the unit’s capacity and features.
Gather Tools and Materials
Get wrenches, pipe cutters, safety gear, pipes, fittings, and mounting brackets.
Prepare the Tank and Lines
Clean the bilge area. Take out debris and oil. Put in strainers to catch big pieces.
Install Risers and Adapters
Add risers and adapters to connect the tank and separator. Tighten every connection.
Position and Secure the Separator
Put the separator on a level surface. Bolt it down with mounting brackets.
Set Up the Filter Elements
Put filter elements in as the manual shows. Make sure each filter fits tight.
Connect Plumbing and Power
Attach inlet and outlet pipes. Use materials that do not rust. Connect the separator to the ship’s power. Add a circuit breaker.
Fill with Water and Test for Leaks
Fill the separator with clean water. Check all joints for leaks. Fix problems before you move on.
Connect the Control System
Wire the control panel and alarms. Test all automation features.
Calibrate and Test the System
Calibrate the oil content meter. Run a test cycle. Check alarms and flow rates.
Complete Documentation
Save all certificates, test results, and training records.
Tip: Always read the manufacturer’s manual before you start. Each model may have special steps.
Teach your crew how to use and care for the separator.
Keep the area around the separator clean and dry.
Test alarms and emergency stops often.
Write down every check, cleaning, and repair in your logbook.
Use only certified parts for replacements.
Ask deyuanmarine support if you have questions or problems.
Task | How Often | Who Does It |
|---|---|---|
Leak Check | Every use | Crew |
Filter Cleaning | Weekly | Crew |
Alarm Test | Monthly | Technician |
Calibration | Every 3 months | Technician |
Full Inspection | Yearly | Inspector |
Alert: Never skip safety checks. Small problems can turn into big risks at sea.
You can print this checklist and keep it near your oily water separator. This helps you follow each step and stay safe.
You help your ship and the ocean by following this guide. Careful setup makes your oily water separator work well. It also helps you follow the law. Use the checklist to stay on track. If you have questions, ask deyuanmarine for help. Do regular maintenance and check your system often. This guide gives you what you need to install with confidence and protect nature.
You should check and clean the separator weekly. Clean filters and sensors keep the system working well. Write each cleaning in your logbook.
You must keep oil in discharged water below 15 parts per million (ppm). This follows MARPOL rules and helps protect the ocean.
You can install it if you follow the manual and safety steps. For complex systems, ask a marine technician for help.
Deyuan Marine separators have ABS, BV, DNV, LR, GL, CCS, and USCG certifications. These show the units meet top marine standards.
The alarm sounds when oil in the water goes above 15 ppm. Check the filter and sensor. Clean or replace them if needed.
Check your vessel’s size and how much oily water you produce. Pick a separator with enough capacity for your needs.
Stop the separator. Tighten fittings and check seals. Clean up any spills. If the leak continues, contact Deyuan Marine support.
You can contact Deyuan Marine’s support team. They help with installation, troubleshooting, and technical questions.
Your installation costs for an oily water separator typically include four parts:
Equipment & sizing
You pay for the separator itself, and cost varies mainly by the capacity you need. If you oversize it, you may waste budget and space; if you undersize it, you may face operating limits or rework.
Compliance & certification needs
If you must meet the 15 ppm discharge limit and comply with applicable IMO requirements (e.g., MEPC standards), your cost can increase depending on whether you add options like a 15 ppm bilge alarm and automatic stopping features.
Installation labor & onboard materials
You should budget for piping modifications, fittings, valves, brackets/foundations, cabling, and labor. The more your existing bilge/overboard system needs to be rerouted, the higher this portion becomes.
Commissioning, testing, and ongoing upkeep
After installation, you may need commissioning and testing, plus routine checks, cleaning, leak inspection, logging, and crew familiarization—these add to your total lifecycle cost.
If you want a faster, more accurate estimate, you can send your ship type, required flow rate/capacity, available installation space, and whether you need a 15 ppm alarm—and Deyuan Marine can recommend a configuration that avoids unnecessary spending.